31.1.20

Unstitching and restitching


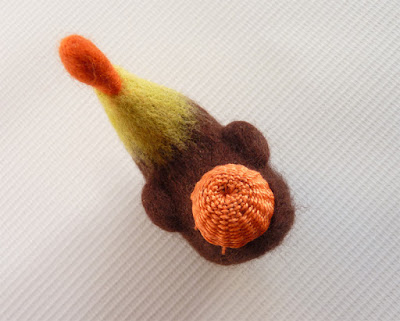
I've been playing around with embellishments for a while now and am very much enjoying adding fancy bits to my work. I'm not sure whether to call it 'darning' or 'weaving' - I think possibly darning, as it is working on top of a surface. Anyhow, one evening this week I spent some time adding some embroidery (or darning) bling to a tail, using a rather lovely tangerine Perle thread. 

It's a bit thicker than the Danish threads I've been using. I don't know whether it was the change in feel, or that I was tired; but it didn't work. I plodded on regardless. Always a mistake when you have that nagging gut feeling that you should stop. Now.


By the time I'd finished,  knew it was wrong. I'd also pulled some dark brown wool fibres up into the darn, muddying the glorious colour. Time to put it down and think about bed. 

Looking at it the next day, I knew what I had to do. Tiny sharp scissors did the job.


The problem wasn't with the darning addition, but with the area I was working on. The tail need to be longer and more rooster like. I set about adding extra tailage. (Not a real word).


Much better. More balance. More working area.


And start again.


*Some time* (two hours) later. I can't think why I didn't do it it like this in the first place.
23.1.20

Untangling the threads


I've been using these threads a lot recently, on some new needle felt work. They are mostly Danish flower cottons. They are harder to get hold of in the UK, but I much prefer them to the thicker, stranded DMC embroidery threads. I've had mine for over twenty years and have always stored them in a vintage 1960s chocolate box, which has become more battered over the years.


The colours are subdued, but have a natural richness to them which I love. However, as you can see, they have become somewhat muddled. Tidying this rainbow melange has been on my 'to-do' list for a very long time. And this year, I finally tackled it. 

Gradually and over several days, I untangled the rats nest of threads, finding it strangely soothing and most satisfying to see the neatly wound pile of card bobbins growing. There are little lessons to be learned, in that brute force will not make a knot disappear. The thread has to be gently coaxed and drawn out softly.


Coincidentally, I have been rummaging through old papers and discovering notes and poetry snippets scribbled out many years ago. One caught my eye. The poem, rather like my tangled threads, needed some rearranging and tidying. I'm not sure why I wrote it, or what I was doing at the time, but it does express some of the quiet comfort to be found in 'doing' with one's hands.

SONG OF SILK

There is darkness around her.
In the darkness, a basket.
She lifts the lid.
The shadows shift.

There is light in her hands.
In her hands, a needle.
The needle flashes.
The darkness retreats.

There is silk in the needle.
In the silk, a song.
The needle flies.
The silk sings.

The day begins.

20.1.20

Starting and finishing


Since losing Andy seven years ago, I find that the New Year doesn't really start until after the anniversary - for want of a better word - of his death. So today marks the finishing of my little batch of cards that I began painting a few weeks ago. It's also the first set of hand made cards I've made since then, intended for a few friends, especially those I don't have much contact with. 

I'm very aware that I have a tendency to drag these things out, so last year, when I had an idea for a design (and knew I wasn't going to do it then), I scribbled it down in a sketchbook.


When I came back to it, I redrew it slightly - just a biro scribble to give me a traceable image.


And an even rougher draft, taking away the loosely shaped 'pond'. I should add that the original plan was to make a lino cut, but the front room, where my press is set up, is unheated and freezing at this time of year.  I decided to hand paint them all.


I had in mind very rich, seasonal colours, but I couldn't make it work. Now I was starting to get myself in a bit of a knot about 'The Card'.


So I lightened the colours up and removed the background. It all went a bit pastel, but that was OK as it was a New Year card after all.


I printed the inner greeting out. In a perfect world I would have letter pressed it, but I couldn't face the cold print room and a need to just get it done led me to my trusty computer printer. Then I made a classic 'me' mistake and painted the first one up on the wrong side. Ho hum.


But  I took a deep breath and carried on. Not just painting, but adding coloured pencil and then not one but two grades of graphite pencil detail. Just to make it more of an effort, because I do have a tendency to make a meal of things.


And now it is the time of year that I dread the most. Some years are better, some worse. But today I have finished my final 2020 card and feel some small sense of achievement. My desk is clear and ready for my own personal New Year. I will make a pie for my lovely Joe and be thankful that I not only survived the worst time of my life, but somehow found the courage to love again. 


From the three 'Fish Kings', Joe and myself, I wish everyone reading this a belated Happy New Year. Here's to all our tomorrows.

26.11.19

Little boat on button wheels


Good ideas can jump on you suddenly and not always at the most convenient moment. I was working on something else entirely in my studio, when an idea for a funny little boat on button wheels popped into my head. I do try to be disciplined about not 'project hopping', as it only leads (in my case)  to muddle and half finished things, so I did what I have always done and grabbed a spare scrap of paper - part of an old receipt in this case - and scribbled it down hastily.


The next day, I put aside twenty minutes to sketch it up properly. while it was still fresh. I do like a nice, tidy sketch, but there is something joyous and free about the very first little thumbnail, with its amendments and notes.


I won't be able to tackle this for some time, but there is already a corner in my mind that is considering the very important issue of - what buttons to use?


18.11.19

Old lane connecting


This is a tiny, pot holed lane that connects us to the nearest shop. You go down a hill, up a hill and there, lurking to the side of the road, is the dark, tree lined entrance to a narrow, muddy uphill track that is still used by locals and farmers. It is quite extraordinary the size of tractor that comes through here; it is quiet at this time of year, but in the summer I have been forced to climb up into the bank, hauling Marjorie, my dear old bike, up with me, to give way. A few weeks ago, the lane was closed due to a mudslide completely blocking it off.

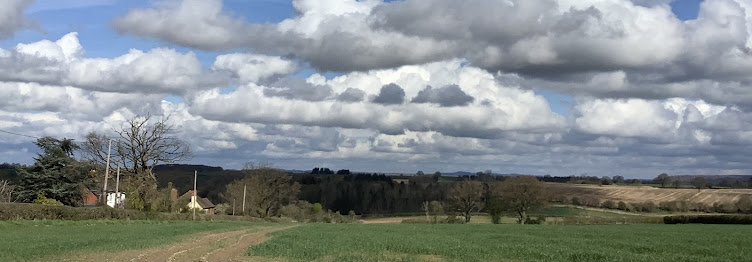
There is a wider lane, further along, but I prefer this one. The high banks indicate that it has been used by travellers - whether by foot, bike, or indeed, tractor, for many years. In the end, it plateaus out to show the broad vista of the Shropshire landscape and the surrounding hills.


The shop itself is about two and a half miles away. It's a nondescript affair on the side of a busy road,  consisting of a garage, Post Office and general stores. While not particularly picturesque, it's a valuable asset to those of us living in the area. I enjoyed my cycle there, bought my few things and made my way home.

We have had weeks of heavy rain and parts of Shropshire have been badly flooded. Today was a stunner though and even the brooding Wrekin in the distance, showed its head above the trees.


The one village I pass through (more of a hamlet really) is best seen from a particular gateway, where the squat, squared church tower can just be made out and the trees cast long winter shadows.


After a mild autumn, the cold is creeping in and finally the leaves are turning, their colours glowing in the remaining puddles, a reminder of the less clement weather we have endured recently.


Heading home, and free wheeling back down into the tunnel of trees, on the old lane. I have to slow several times, to avoid going down deep potholes, but when I arrive home my head is swirling with images of an ancient road that has connected our remote clusters of houses and cottages for centuries.

7.10.19

Pink Fir Apples


The field next door has been ploughed for the first time since I moved in, seven years ago. It's somewhat dramatic, but I do like a nice spread of tidy earth.

The time has come to sort the vegetable patch, depending on the weather of course.  One of the small crops of potatoes I planted in the Spring were Pink fir Apples. I first came across these many years ago in Waitrose (not my usual shopping habitat, but it is good for wandering round, window shopping).  They were rather expensive for my budget, but I bought some, as I liked the quirky shapes. They were quite delicious and I've tried growing them twice since, with limited success as they never grew to anything much.


However, I gave them another go this year and we had an initial dig in July. Again, I was disappointed with the size. Three plants gave us this amount of tubers, which when washed, looked alarming like baby rats. They were excellent though, steamed and buttered. 

Before I gave up on Pink fir Apples once and for all, I did a web search for tips. and discovered to my surprise, that they were not, as I had always presumed, 'earlies', (summer croppers) but one of the longest growing main crop potatoes, needing at least two months more in the ground before harvesting. So we left them. And waited.


Last night I took my big garden fork out into the dwindling light and began digging under the now-dead top growth. What a difference three months had made. I couldn't help but wish I'd done my research beforehand, as the first baby crop would have been so much more prolific had I left them to grow. However, lesson learned and something to aim for next year. 

I've had quite an interesting response to these on my Instagram account - they do still seem to be a rarity over here, though some people have tried and enjoyed them. An Argentinian follower told me that over there they are known as 'Papines' or loosely translated, 'little potato', so I'm guessing that they are a more exotic species in the UK than the traditional King Edwards, but well worth growing if you don't make my initial mistake and dig them up too before their prime.


4.10.19

Ewe Tree


After being flattened by what can only be called 'the first lurgy of winter', I finally got  round to finishing off a small artwork I began several weeks ago, 'Ewe Tree'. As you can see, it was inspired by one of my recent needle felted landscapes 'Shepherd's Cottage'. I recorded the initial stages on my Instagram account - this not only shares my work process with my followers, but also helps my flagging confidence when I get to the horrid mid-way stage.
 

I love layering barely tinted washes. They are left to dry naturally (no hair dryer short cuts). I keep an eye on each wash as it dries out, until I am sure I can safely leave it to finish off overnight, with no unintentional blotches. Then I put down the punchier colour work.


But to return to the horrid mid-way stage. This is when all the colour work is done and the whole thing has an fuzzy, unfinished look. Time to tighten it up with some minimal pencil work, which pulls the whole thing together. There is a trick to knowing when to stop, so that the lovely granulation and natural paint patterns can work their visual magic.


This piece was specifically designed for the round window mount that it comes with, but I have left the surrounding 'bleed' that you can see in the above picture, for alternative mounting. 'Ewe Tree' is, as I write, available for sale in the artworks section of my Etsy shop.   


Having achieved my first finished artwork of the year, I ordered some professionally printed Giclée art prints on lovely Hahnemühle Photo Rag Pearl 320gsm paper, as I know that not everyone can stretch to buying an original artwork. They are available with mounts in the prints section of my shop, with free UK shipping.

The prints are also presented in the same sized mount, but being slightly larger, the aperture size is bigger. Again, I have left the surrounding area underneath intact, as I am sure that not everyone is as obsessed with circular art as I am and may have their own idea about how they would like to view it. 

If they go well, I will be delving into my archives to have other artwork made into prints. And of course, picking up my paintbrushes again.


22.9.19

Lavender and summer's end


Summer is drawing to a close and with that comes the annual pruning of the lavender bush. It must be six years since I dumped it as a small sprigling  in a hollow wall brick, to take its chances and it has thrived. The bees turn it into a busy, humming factory and  continue to try to gather pollen even when the flowers are completely over. Which is why I leave pruning until the very end of the season.


This year I have pruned back harder than ever, in an effort to make it a little smaller and bushier. It now looks rather rugged and shorn, but there are tiny leaf nubs emerging. I cut right back to the tiniest ones, as near to the main stems as possible and remove as much deadwood as I can find. 
 
There has been a bumper harvest. Each year I bring it into the house to dry in a basket, and use it as natural kindling when we begin to use the wood burner. Every time I light the stems on a chilly winter's night, the smoke smells faintly of hot, herb scented summer days and I remember the sunny, buzzing sound of foraging bees.


28.8.19

White gold, green gold


It's been a funny season in the vegetable garden. Our weather has been very erratic, and some things have struggled. I planted two small crops of potatoes and we decided to investigate them at the weekend. One batch was planted as a pioneer, right at the end where the really poor soil was. I wasn't expecting much, but it is always exciting to shove a fork in, turn the earth and see what comes up.


At first it seemed as if there would be little or nothing, but two plants provided enough for dinner. They were rather misshapen and scabby, but a good scrubbing brought up the  yellowy skins and they were, in fact, delicious. 

  
My planting in the front patch has also been hit and miss; I envisaged a carefully landscaped herb patch with pretty little alpines spotted about. However, I planted dwarf comfrey. Wild comfrey grows quite large, so when I bought some 'dwarf' comfrey roots, I anticipated that they would be of a fairly modest size. 


This has not turned out exactly as planned; dwarf comfrey does, in fact, grow just as large as wild comfrey. It has grown into a many headed beast. My reason for cultivating it was purely practical; comfrey leaves (I have read) make excellent liquid fertiliser. The good news is that I have plenty of them and the plants thrive on being cut back. The bad news is that they are far too much of a thug to grow here and will have to be relocated to a wild patch, where they can flourish without drowning out their smaller neighbours. (Somewhere behind this lot are two lavender bushes and a curry plant). 


I harvested a fair amount. The leaves were torn into pieces and are now soaking in water, in a  not-very-picturesque plastic bucket. They rot down very quickly and produce an almost black, viscous liquid which frankly stinks to high Heaven. I'm going to need a bigger bucket. 


21.8.19

Mixing up green


My sketch books have many little hastily scrawled notes lurking in the back pages. They are my bank of ideas and often I have a plan in mind for them which I know may not be implemented for some time. For my first foray back into printing I chose this thumbnail of one of my cats, drawn in 2011. 

Mousie was a very slug like little creature and she was fluidly sprawled over a large cushion in deep sleep. At the time I knew that I'd want to turn this sketch into a two colour print, not knowing that it would take me eight years to realise this. 


Back in the present day, I re-drew the original sketch, adding more tail and took the artistic liberty of changing little browny-grey Mousie to a bright orange, which suited the sludgy green I wanted to use for the cushion. Then I cut two small, simple lino plates and backed them onto board to strengthen them.


I opened my tins of oil based printing ink with some trepidation, as they had been dormant for so long. They had acquired dried rubbery caps on top, but they were fine underneath. Could I still mix colour? Well yes, as it happens. To my surprise, I managed to achieve the understated green easily.


I had kept my home made registration block, despite nearly binning it a few years ago. I was glad I did; it's only made from thick board but is still useful.


I made several test pulls as the lino thirstily soaked up the ink and the first batch was quite patchy. I also needed the practice of smoothly inking up the plate. Eventually (and with some trepidation) I moved on to my newly purchased printing paper. It took most of the evening to produce the quantity I needed and by the time I had finished I had amassed  a considerable amount of green blobs.

Only some of these were up to scratch, which is fine. Some will do for the first test pulls of the next stage, the orange cat.


When they were dry, I sorted them into three piles - poor, passable and spot on. Now I need to move on to the second plate, which should be less nerve wracking, as I've learned from my mistakes and should be able to produce a small edition of good prints. I've only attempted multi-block printing once, many years ago when I was at college, so this will be interesting.